Spring Security入門した
はじめに
今回の記事では以下の実装を行ったのでメモ書きとして残しておきます。
- EclipseでのSpring Loadedを使ったHot Swap
- Thymeleaf3とSpring Securityによるフォーム認証
EclipseでのSpring Loadedを使ったHot Swap
公式に見にいくとIDEAしか書いてません。禿げた。
build.gradleに以下の設定を追加します。
apply plugin: 'eclipse'

buildscript {
    repositories {
        mavenCentral()
    }
    dependencies {
        classpath 'org.springframework.boot:spring-boot-gradle-plugin:1.4.2.RELEASE'
        classpath 'org.springframework:springloaded:1.2.6.RELEASE'
    }
}

eclipse{
    classpath {
        defaultOutputDir = file("${project.buildDir}/classes/main/")
    }
}
できました。
ここで1つ問題があります。
eclipseのbuildshipプラグインを使って、gradleのプロジェクトをリフレッシュすると
なぜかクラスの生成先がbinフォルダに固定されてしまいます。
Gradle IDEを使うとgradleのeclipseコマンドが動いているようなので
期待どおりに.classpathファイルが生成されます。
ホットスワップサイコー!!!
Thymeleaf 3とSpring Securityを使う設定を追加します。
build.gradleに以下の記述を追加します。
dependencies {
    // ....
    compile 'org.springframework.boot:spring-boot-starter-security'
    compile 'org.thymeleaf:thymeleaf:3.0.0.RELEASE'
    compile 'org.thymeleaf:thymeleaf-spring4:3.0.0.RELEASE'
    compile 'org.thymeleaf.extras:thymeleaf-extras-springsecurity4:3.0.0.RELEASE'
}
Spring Securityによるフォーム
まずは画面のファイルです。
src/main/resources/templates/login.htmlというパスに配置します。
<!DOCTYPE html>
<html lang="ja">

<head>
  <title></title>
  <meta charset="UTF-8">
  <meta name="viewport" content="width=device-width, initial-scale=1">
</head>

<body>
  hello out friend.
  <form id="login_form" method="post" action="/login/post">
    <label>ログインID</label>
    <input type="text" id="login_id" name="login_id" placeholder="ログインIDを入力してください" autofocus="" required="" />
    <label>パスワード</label>
    <input type="password" id="login_password" name="login_password" placeholder="パスワードを入力してください" required="" />
    <input id="login_button" type="submit" value="ログイン" />
    <input type="hidden" th:name="${_csrf.parameterName}" th:value="${_csrf.token}" />
  </form>
</body>

</html>
th:actionとか使うと勝手にtokenが入るみたいですが
とりあえず今回は自分で書きました。
後で試します。
ここでハマったのはth:nameじゃなくてname属性で記述して
アルェーオキカワラナイゾーって一人ハマってました。
loginフォームの表示のためにtemplateを使うので
なんかアホらしいですが、Controllerを書きます。
@Controller
public class AuthController {
  @GetMapping("/login")
  public String login(Model model) {
    // テンプレート名
    return "login";
  }
}
Security周りの設定をJavaで記述します。
@Configuration
@EnableWebSecurity
public class SecurityConfig extends WebSecurityConfigurerAdapter {
  @Override
  protected void configure(HttpSecurity http) throws Exception {
    http.csrf()
      .csrfTokenRepository(CookieCsrfTokenRepository.withHttpOnlyFalse());
    // ログインページは誰でも見れないといけない
    http.authorizeRequests()
      .antMatchers("/login")
      .permitAll()
      .anyRequest()
      .authenticated();
    // ログインはフォーム認証, ログイン成功後topに戻る
    http.formLogin()
      .loginProcessingUrl("/login/auth")
      .loginPage("/login")
      .defaultSuccessUrl("/")
      .usernameParameter("login_id")
      .passwordParameter("login_password");

    // ログアウト処理ページとその後の遷移
    http.logout()
      .logoutRequestMatcher(new AntPathRequestMatcher("/logout"))
      .logoutSuccessUrl("/login")
      .permitAll();
  }

}
application.ymlに以下の設定を追加しておきます。テスト用です。
security:
  user:
    name: test
    password: test
http://localhost:8080/にアクセスすると
http://localhost:8080/loginにリダイレクトされると思います。
loginした後はhttp://localhost:8080/に飛ばされ
http://localhost:8080/logoutにアクセスすると
もとのログインページに戻される動きが確認できると思います。
まとめ
サクッとSpring Securityに入門してみました。
この上になんか建ててみる予定です。
最後にめちゃくちゃ省略してしまったbuild.gradleを晒しておきます。
apply plugin: 'java'
apply plugin: 'jacoco'
apply plugin: 'com.diffplug.gradle.spotless'
apply plugin: 'eclipse'
apply plugin: 'org.springframework.boot'

sourceCompatibility = 1.8
targetCompatibility = 1.8

buildscript {
    repositories {
        mavenCentral()
    }
    dependencies {
        classpath 'com.diffplug.spotless:spotless-plugin-gradle:3.0.0'
        classpath 'org.springframework.boot:spring-boot-gradle-plugin:1.4.2.RELEASE'
        classpath 'org.springframework:springloaded:1.2.6.RELEASE'
    }
}

repositories {
    mavenCentral()
}

// alias
task format(dependsOn: 'spotlessApply')
spotless {
    def headerFile = "/** "+project.file('../LICENSE.md').text+"*/"

    java {
        licenseHeader headerFile, '(package|import) '
        eclipseFormatFile project.file('eclipse-format-setting.xml')

        trimTrailingWhitespace()
        endWithNewline()
    }
}

eclipse{
    classpath {
        defaultOutputDir = file("${project.buildDir}/classes/main/")
    }
}


dependencies {
    compile 'org.springframework.boot:spring-boot-starter-data-jpa'
    compile 'org.springframework.boot:spring-boot-starter-data-rest'
    compile 'org.springframework.boot:spring-boot-starter-security'

    compile 'org.springframework.boot:spring-boot-starter-web'
    compile 'org.thymeleaf:thymeleaf:3.0.0.RELEASE'
    compile 'org.thymeleaf:thymeleaf-spring4:3.0.0.RELEASE'
    compile 'org.thymeleaf.extras:thymeleaf-extras-springsecurity4:3.0.0.RELEASE'

    compile 'com.h2database:h2'

    testCompile 'org.springframework.boot:spring-boot-starter-test'
    testCompile 'org.jmockit:jmockit:1.21'
    testCompile 'junit:junit:4.12'
    testCompile 'org.assertj:assertj-core:3.2.0'

    compileOnly  'org.projectlombok:lombok:1.16.14'
    testCompileOnly   'org.projectlombok:lombok:1.16.14'
}
追記:
今回の記事ではSpringloadedを使っていますが、Spring Boot Dev Toolが強いそうです。 Application.ymlを変更したら自動でアプリが再起動しました。びっくりします。
spring-boot-devtoolsで開発効率上げようぜ、的な。 (Spring Boot 1.3) - Qiita
TypeScriptとjestでカバレッジを取る
前置き
この記事は下記の記事を補足する形で書いていきます。
React + TypeScriptでjestを使ったテストをする - かずきのBlog@hatena
この記事で行うのはTypeScriptのテストを行って、jestでカバレッジを取るまでです。
足回り
まずはtsconfig.jsonです。とりあえず使いまわししてるので変なところがあれば教えてください。
{
  "compilerOptions": {
    "module": "commonjs",
    "moduleResolution": "node",
    "target": "es6",
    "lib": [
      "dom",
      "es2016",
      "es2017"
    ],
    "noImplicitAny": true,
    "strictNullChecks": true,
    "noFallthroughCasesInSwitch": true,
    "noImplicitReturns": true,
    "noImplicitThis": true,
    "noUnusedLocals": true,
    "noUnusedParameters": true,
    "noImplicitUseStrict": true,
    "sourceMap": false,
    "emitDecoratorMetadata": true,
    "experimentalDecorators": true,
    "forceConsistentCasingInFileNames": true,
    "listFiles": false,
    "stripInternal": true,
    "skipDefaultLibCheck": true,
    "pretty": false,
    "noEmitOnError": true
  },
  "exclude": [
    "node_modules"
  ]
}
モジュールのインストール
今回はほとんど使わないですが@typesで型定義を読み込みます。
tsconfig.jsonのcompilerOptions.typesの定義をしていない場合に自動で読み込まれます。
もちろん自分で記述することもできますが。
yarn add @types/jest @types/react @types/react-dom ts-jest jest typescript -D
yarn add react react-dom
今回、この型定義の読み分けをsrcとtestで切り分けしようかと思ったのですが
できませんでしたので、実装コード側でもjestの型定義が読まれることになります。
babelとESLintの組み合わせだとフォルダで切り分けとかできるんですが・・・
(eslint-plugin-mochaとかその辺使うイメージです)
jestの設定とtestの設定
package.jsonに以下の設定を記述します。
ちなみに、testMatchというキーのほかにtestRegexというキーでテストのファイルを指定することができます。
どちらか片方しか使えません。
今回はjestはnpm scriptsで動かします。
また、今回はTypeScriptを使うため、preprocessorを指定しています。
読み込み前に変換するモジュールですね。
カバレッジはcollectCoverageをtrueにするだけで取ることができます。
カバレッジの対象を実装コードのみにcolelctCoverageFromで絞ってあげましょう。
  "scripts":{
    "test":"jest"
  },
  "jest": {
    "moduleFileExtensions": [
      "ts",
      "tsx",
      "js"
    ],
    "transform": {
      "\\.(ts|tsx)$": "<rootDir>/node_modules/ts-jest/preprocessor.js"
    },
    "testMatch": [
      "**/src/test/front/**/*.ts?(x)"
    ],
    "collectCoverage": true,
    "collectCoverageFrom": [
      "src/main/front/**/*.ts?(x)"
    ]
  }
とりあえずのテストコード
サンプルソースです。
console.log("hellox")
export default function () {
  console.log("test")
  if (typeof window == "object") {
    console.log("not reached")
  }
}
で、こちらがテストコードです。
エラーが発生しないことを確認するだけの簡単なテストです。
unmockで実装がしっかり呼ばれるようにしておきます。
import x from "../../main/front/test"
jest.unmock("../../main/front/test")

describe("test", () => {
  it("no error", function () {
    x()
  })
})
テストを実行してカバレッジを取ってみる。
初めにnpm scriptsで設定したので
npm testで動作するはずです。
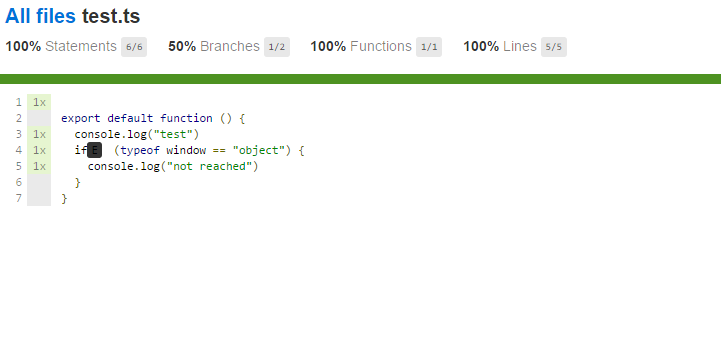
${project}/coverage/lcov-report/index.htmlにカバレッジが吐き出されているので見てみます。


カバレッジが取れています。
やったね!100%カバレッジだ!!()
は?本来、通らないはずなんだけど???
なぜカバレッジ100%になったのか
jestはnode上で実行されているため、本来window objectはglobalに定義されていないはずですが
定義されているため、通らないと思っていたコードが実行されています。
これはjsdomのwindowオブジェクトによってmock化されています。
詳しくは以下の記事にどうぞ。
なぜJestが全てをモックできるのか - Qiita
まとめ
jestでカバレッジを取るために、駆け足でブログを書きました。
おかしなところがあれば教えてください。
TypeScript環境でnycとtapeを使って、カバレッジを取るテスト環境を整える。
初めはavaを使おうと思ってたんです。
下記の説明を見たところコンパイルしてからやってね、みたいな形になっています。 github.com
avaはmagic-assertを使っており、jsに対してassertの表示を見やすくするための処理が入ってるはずです。 そのため、babel等を使う前提で作られています。そのため、TypeScriptへの対応はまだされていない模様です。
というわけで諦めて、tapeとts-nodeとnycでカバレッジを取ってみます。
yarn add tape ts-node nyc typescript @types/tape -D
package.jsonにnpm scriptsを記述します。 今回はコンソールに出力したいのとhtmlでも出力してみたいので reporterを2つ指定してあります。
{
  ....
  "scripts":{
     "test": "nyc --reporter=html --reporter=text tape src/test/front/**.ts"
  }
}
同じく、package.jsonにnycの設定を追加します。
{
  ....
  "nyc":{
    "include": [
      "src/main/front/**/*.ts"
    ],
    "extension": [
      ".ts"
    ],
    "require": [
      "ts-node/register"
    ],
    "all": true
  }
}
サンプルコードとテストコードです。 tapeのendメソッドを呼ばなくても動きそうだと思ったのですがうまくいかず・・・
// module.ts
export default function(){
  console.log("test")
  if(typeof window=="object"){
    console.log("not reached")
  }
}

// module.spec.ts
import * as test from "tape"
import module from "../../main/front/module"
test('xxx', (t)=>{
  module()
  t.isEqual("a","b")
  t.end()
})
npm test
こんなログが出ます。
PS D:\workspace\spring-sandbox\oauth> npm test

> spring-sandbox@1.0.0 test D:\workspace\spring-sandbox\oauth
> nyc --reporter=html --reporter=text tape src/test/front/**.ts

TAP version 13
# xxx
test
not ok 1 should be equal
  ---
    operator: equal
    expected: 'b'
    actual:   'a'
    at: Test.test (D:\workspace\spring-sandbox\oauth\src\test\front\test.ts:5:5)
  ...

1..1
# tests 1
# pass  0
# fail  1

----------|----------|----------|----------|----------|----------------|
File      |  % Stmts | % Branch |  % Funcs |  % Lines |Uncovered Lines |
----------|----------|----------|----------|----------|----------------|
All files |       75 |       50 |      100 |       75 |                |
 test.ts  |       75 |       50 |      100 |       75 |              5 |
----------|----------|----------|----------|----------|----------------|
npm ERR! Test failed.  See above for more details.
htmlのカバレッジレポートもこんな感じで出力されました。

まとめ
avaが使いたかったところから迷走した感があります。
よくよく考えたらTypeScript使うので jasmineでいい気がした。(apiがわからない問題は解決するはず) つまり、カバレッジも取れそうだし jasmineベースのjestでいい気がしました。
また、環境構築し直しです。